Wednesday, April 9, 2014

GorillaPod Tripod Review

A recent re-posting of my earlier tripod article, Maximize Your Tripod, generated a lot of interest from readers who were not familiar with the GorillaPod line of flexible travel tripods. To that end, I thought it might be useful to provide a more in-depth review of the GorillaPod and some of the common scenarios for which it can prove quite useful.

GorillaPod Tripod Review | Boost Your Photography

What is a GorillaPod?

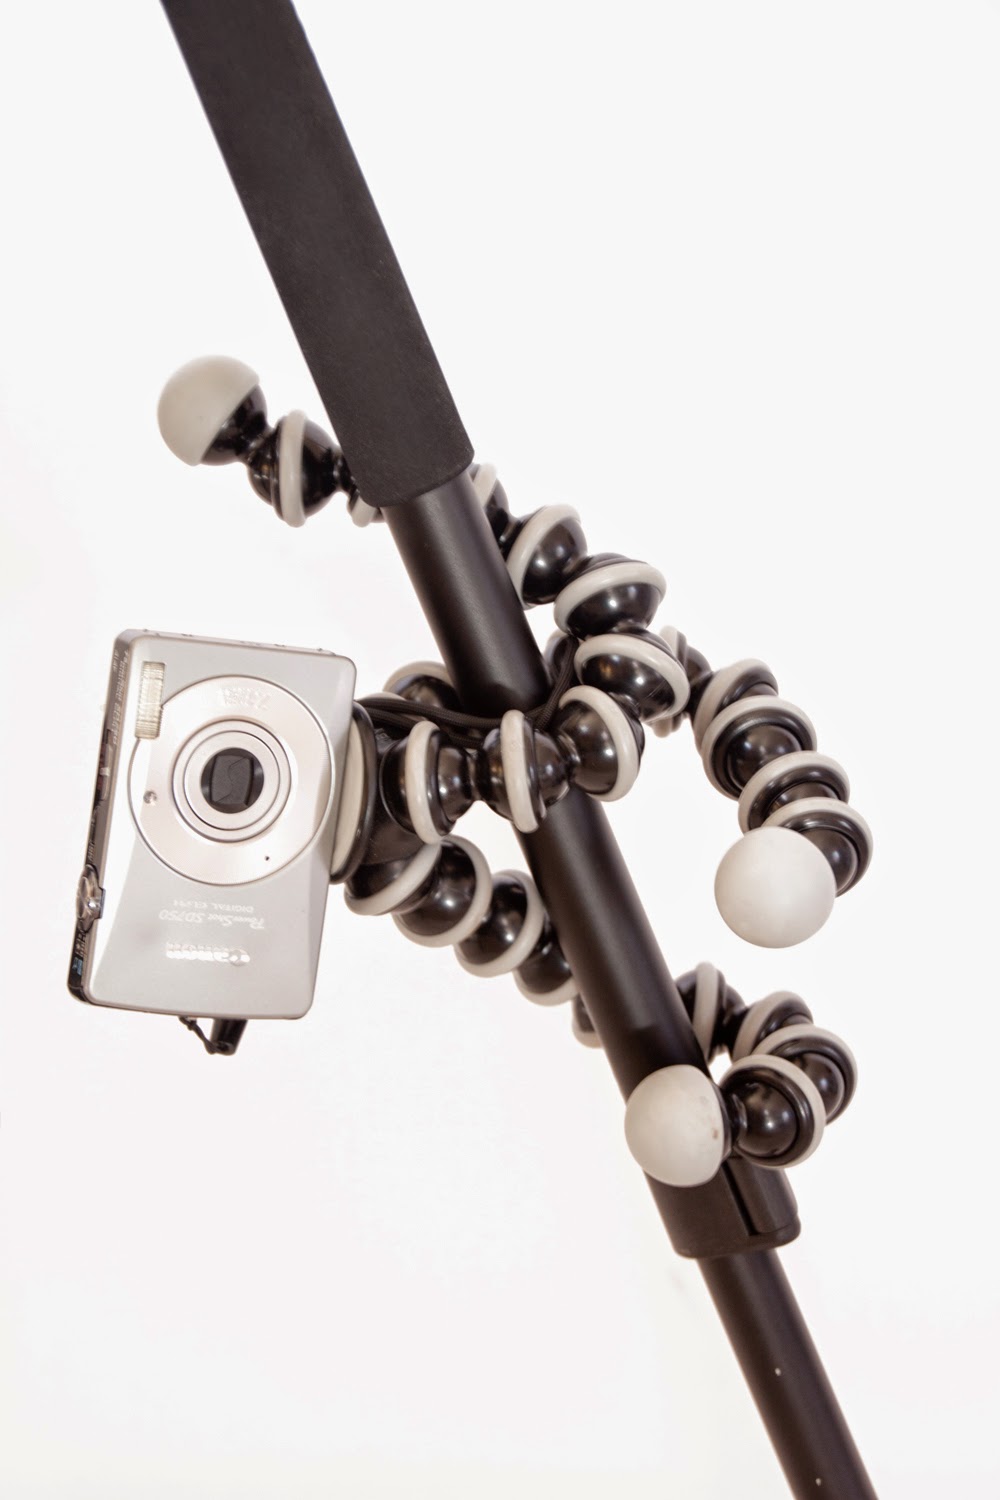
The GorillaPod is a line of tripods made by Joby that are constructed with flexible legs of multiple ball-shaped units that can be moved and manipulated in a variety of ways. There are several different varieties, so you want to be sure that you purchase one rated for your particular camera.

Joby GorillaPod GP3 Tripod Review | Boost Your Photography

The Joby GorillaPod original comes in several different colors and is rated for point-and-shoot cameras. The Joby GorillaPod grip tight has an adjustable grip stand to hold cell phones. The Joby GP3 GorillaPod is rated for DSLR cameras and is also available in a GP3 version with adjustable ball head. I have the basic version, which is what you will see pictured in the setup photographs, but I am strongly considering purchasing the adjustable ball head as an add-on (but more on why later). The heavier and bulkier Joby GP3 GorillaPod can also be used with point-and-shoot cameras, but I would not risk using a heavy DSLR camera on the lighter original version.
Portability and Ease of Use

The GorillaPod is very portable and easy to use. You simply screw the tripod into the tripod mount at the bottom of your camera. I find it easiest to hold my camera tightly upside-down and quickly rotate the GorillaPod around until it tightens. Because I generally wear my camera slung over one shoulder, I often leave the GorillaPod attached when moving from shot to shot, and it just hangs down underneath the camera. When not attached, even the larger Joby GP3 (at less than 10 inches long) fits easily into even a mid-range sized purse. (Add 2-3 inches for the version with the ball head.)

GorillaPod Tripod Review | Boost Your Photography

The legs are very easy to bend and manipulate, but at the same time, I have found that they are also quite solid and stable once you have finished adjusting them. You can pull the three legs apart and use the GorillaPod like a traditional tripod. You can use them to bend and wrap around something to hold the camera up or even suspended. You can even bend them down to nearly flat and allow you to aim and position your camera from down near ground level.

Compare GorillaPod and Full-Size Tripod | Boost Your Photography

The ability to set up your camera down near ground level is one of the most useful features of the GorillaPod. With a standard tripod, you are often limited in how low you can set up, as most heavy-duty full-scale tripods have a center pole that limits the minimum height of the tripod. The GorillaPod allows you to keep your camera close to the ground but also gives you the precision to adjust your aim and angle, which you don't have if you simply place your camera on the ground. This low viewpoint can give your photographs a unique perspective.

Joby GorilladPod Tripod Review | Boost Your Photography

My main complaint with my current GorillaPod, the Joby GP3, is that it is difficult to make minor adjustments to the position of the camera, such as those required to keep the camera perfectly level. Crooked horizons can frustrate any photographer, and they can be a particular problem with the GorillaPod (especially if you are shooting low at ground level and don't want to have to lie on your side to see through your viewfinder). This is where the adjustable ball head with level would come in extremely handy, as it would give you more minute precision and allow you to easily see whether your camera was aimed level.

GorillaPod Example Shots


These two photographs were taken from the same location, but the top version was shot from the minimum height of my full-scale tripod, and the bottom version was shot using the GorillaPod near ground level. I really like the wide-angle feel that the GorillaPod shot gives with the inclusion of the decking and the added context to the shot.

Motion Blur Merry-Go-Round Selfie Taken with GorillaPod | Boost Your Photography

This is my all-time favorite scenario for a GorillaPod and one of my all-time favorite selfies (it's even featured on my About page). Here, I used my GorillaPod to secure my camera onto the far pole of the merry-go-round. Then, I set the camera for a 10-second timer delay and had it shoot a series of six photographs at a time. All I had to do were choose my settings, set the focus, hit the shutter button, and start running!  Once I mentally had counted down to about 8, I jumped onto the merry-go-round and tried to keep smiling until the camera was done shooting the whole series.

GorillaPod Merry-Go-Round Setup | Boost Your Photography

Joby GorillaPod Conclusion

Overall, I strongly recommend the Joby line of GorillaPods. They are a fantastic option for a travel tripod, as even the heavy-duty versions are fairly small and portable, especially when compared to a full-scale tripod, and you can easily fit one in a purse, backpack, or camera case. If you have been looking for a tripod and are not sure that you want to make the jump to a full-size one, the GorillaPod is a great option. The flexible nature allows you to use it in a variety of common (and uncommon) situations, and it can really make a strong impact on your photography.


Boost Your Photography: Learn Your DSLR is now available from Amazon. Get the most out of your camera with practical advice about the technical and creative aspects of DSLR photography that will have you taking beautiful pictures right away.

Monday, April 7, 2014

5 Must-Read Articles on Food Photography


A well-done food photograph can make you stop in your tracks, drool a little bit, and immediately want to head out to the nearest restaurant or grocery store. This post is a collection of five must-read articles on how to dramatically improve your own food photography and ensure delicious-looking, drool-inducing images every time.

Styling and Props

Styling and Props: How to Find Your Style 

The first article, Styling and Props: how to find your style, comes from the blog What's for Lunch, Honey? a food blog based in Germany. Every image in this article has an incredible sense of style and tells an immediate and engaging story. The article itself is packed full of tips about how to find and decide upon accessories and lighting to create your own style and tell a unique story with your food photographs. I love her tips about picking up individual pieces of antique silverware and the stress on color combinations and coordinating your overall look.

Finding Props for Food Photography

The second article, Finding Props for Food Photography, is a guest post on Gourmande in the Kitchen by Naomi Robinson of Baker's Royale. Here, she deconstructs specific food photographs and explains where she obtained all of the background and accessory pieces, including example keywords for you to use when searching for similar items. A great resource for seeking out unique and inexpensive items to really add that punch to your food photographs.

Food Photography Set-Up and Lighting

Food Photography: a few of my tips and tricks 

This post, Food Photography: a few of my tips and tricks, comes from the food blog, Katie's Cucina. What I appreciate about this post is her inclusion of set-up shots of her food photographs, including how she uses a light tent to create amazing shots that look straight-out-of-the-kitchen. (As a bonus, it looks like the same light tent, the Square Perfect SP500, that I own, love, and have reviewed previously.) This behind-the-scenes peek offers a detailed look into how a great food photograph comes together, and she offers useful advice about composition and storytelling.

Composition and How To

Quick Tips to Improve Your Food Photography | Boost Your Photography

My own contribution to the conversation about food photography is the post, Thankful ... for Food Photography, which first appeared on the blog around Thanksgiving. The post includes details and examples for the heading topics of use natural light, watch the background, get in close, accessorize, go wide (aperture), and tell a story. Each topic includes an explanation and one or more example images to illustrate the point, which makes it easy to immediate take and apply these suggestions to your own food photographs.

Post-Processing Walk Through

Blueberries and a Basic Food Photography Post-Processing Tutorial

Now that you have planned, composed, and captured the perfect food photograph, you might want to do some additional primping and tweaking. If so, then this final post, Blueberries and a Basic Food Photography Post-Processing Tutorial is for you. This post from the web site Eyes Bigger Than My Stomach walks you through the workflow from straight out of camera (SOOC) original to final, finished product using Adobe Lightroom and Photoshop. This is an excellent 'how to' resource for those looking to use post-processing to do even more with their food photographs.

Want more great ideas? Follow Boost Your Photography on Pinterest: Boost Your Photography


Saturday, April 5, 2014

Looking for Feedback

As part of reaching our One Year Blogoversary milestone, I am continuously working to improve and meet your needs for photography advice and inspiration. I have put together a short (8 question) survey to gather your feedback about Boost Your Photography and seek input about future directions and posts. Please consider taking a few minutes of your time to share your thoughts. Click here to take the survey. Thanks!


Not interested in surveys? You can always leave feedback and advice in the comments or connect with Boost Your Photography through various social media outlets.

I look forward to hearing from you!


Wednesday, April 2, 2014

Make the Shot: Droplet Refraction

Keeping our theme of macro and droplet photography (Make the Shot: Water on CD), today's post gives you a behind-the-scenes look at the classic water droplet multiplicity shot.


How to Shoot a Multidroplet Shot

You only need a few basic supplies to replicate a shot like the one above.

  • A piece of glass or glass dishware (I used the glass from a photo frame for an 8x10.)
  • Water spray bottle or eyedropper
  • Plastic wrap
  • Supports to hold up the glass (I used four pint glasses.)
  • Colorful patterned paper or fabrics (You can even use an image on your tablet.)
  • Tripod recommended (Read How to Maximize Your Tripod here.)
The setup, as shown below, is straightforward. Find a spot with a lot of natural light (preferable, but you can also try with indoor lighting too). Place the pint glasses far enough apart that you can easily slide your patterned paper, fabrics, or tablet underneath. Wrap to top of your glass or glass dishware with a piece of plastic wrap. (The plastic wrap will help the water bead up on the surface. Water sprayed on glass alone is more likely to simply run off and smear.)


Use the water spray bottle to cover the plastic-wrapped glass in beads of water. Spray using a fine mist setting. The longer you spray, the more the water will conglomerate and the bigger and bigger your droplets will be. The goal is to have an even collection of similar-sized droplets. (Alternatively, you could mix your water with a little glycerin to increase the surface tension. And/or you could use an eye dropper to carefully place evenly-spaced and sized drops.)

One you have your droplets looking the way you want them, you can lay out your first background pattern piece underneath the glass. (Wait until after you are done spraying to do this part, otherwise your paper will end up soaked.) Then, set up your tripod, if using. You will want to position your camera above the glass with the lens of the camera parallel to the glass. This will ensure even focus across as many droplets as possible. Consider using a close-up lens, extension tubes, reverse ring mount adapter, or a macro lens to get an even closer-in shot of the droplets.

Unfocused Droplet Refraction | Boost Your Photography

You will need to shoot with a fairly narrow aperture (like f/14 or f/22) in order to get the entire droplet in focus from top to bottom. The photograph above was shot at the wide aperture of f/2.5, which has a very thin depth of field. In this shot, it is clear that only the top of the droplet is in focus. The sides of the droplet, in contrast, are already blurry and out-of-focus.


This photograph was shot at f/14, which required a shutter speed of 1/3rd of a second. At that slow of a shutter, it is imperative to use a tripod, as any attempt at hand-holding for that long with result in visible camera blur and shake. Even at f/14, you may notice that the smaller droplets are not in focus but that you can clearly see the refracted and distorted views through the top and sides of the larger-sized droplets.

Play around with different shapes and styles of backdrops. 12x12 inch scrapbook paper works really well as a source for patterns, as it is easily obtained, inexpensive, and a large enough size to cover the entire refracted region in the droplets. Both the flowers and shamrocks above were scrapbook paper.


For this image, I used a photograph of mine shown on a 7 inch tablet. Because of the smaller size of the tablet, compared to the 12-inch paper, you can actually see the edges of tablet and even the nearby window refracted in some of the droplets.

Water Droplet Refraction of a Flower | Boost Your Photography

You can also use a single image, rather than a repeating design or pattern. In the photograph above, each droplet is refracting a photograph of a single water lily. This was a 5 x 7 inch photograph, and the white edges of the image are visible in some of the droplets.

You can also see how the refracted image is rightside-up to our eyes but that the original photograph is upside-down. Keep in mind that refracted images will be reversed if you are using an image or pattern that has a discernible top and bottom.

What Will You Refract?


The droplet refraction possibilities are endless. What will you refract? Share a link in the comments below!

Want more great ideas? Follow Boost Your Photography on Pinterest: Boost Your Photography


Monday, March 31, 2014

A Year Ago on Boost Your Photography

Welcome to a new alternate-weekly post: A Year Ago on Boost Your Photography. Now that we have passed the one-year threshold, this series will provide a look back at the week that was (or weeks that were) for previous years of posts and information. This series will alternate on Mondays with another new addition: compilation posts of great photography resources and articles from around the web.

2013:

  • Make the Shot: Close-up Eyeball. Our first 'how to' post provides step-by-step directions (and set up information) for taking a close-up or macro photograph of your own eyeball. 
Make the Shot: close up eyeball | Boost Your Photography


  • Travel: What's Your Sign? Our first live post, this one provides ideas and inspiration for photographing signs when you travel.
Travel Photography: What's Your Sign? | Boost Your Photography

Friday, March 28, 2014

One Year Blogoversary Deal!

Today marks a full year since the official launch of Boost Your Photography (originally Archaeofrog Photography). One year and one hundred ten posts later, there is a lot to celebrate!

It has been so much fun sharing this journey with you and helping so many people to grow in their creativity and skill set as photographers. To keep the growth and celebration going, starting today there is a very special Kindle Countdown Deal on my photography eBook, Boost Your Photography: Learn Your DSLR!


Starting from right now and lasting 48 hours, you can get your own copy of Boost Your Photography: Learn Your DSLR for better than half off, or only $1.99. Still not sure? If you wait too long, the price will jump to $2.99 for another 24 hours before settling back in at the original (and still an amazing value) price of $4.99. (Click the cover or links above to see how much time is left in the deal. This deal above is only available through Amazon.com. Click here to see the Amazon.co.uk version of the deal - same timing, great savings!)

For about the cost of a pack of gum, you can have over 120 pages of step-by-step photography advice to get you out and shooting with your DSLR camera. Best of all, the Kindle eBook format means that it is portable and accessible from anywhere, including your computer, tablet, or cell phone.

Here are a few thoughts from reviewers of Boost Your Photography: Learn Your DSLR:

"I just read your take on camera zero - thank you for making it so easy to follow and understand!"

"With her background as an educator and academic, Katie clearly and expertly explains the basics of using a DSLR camera. She gives concrete examples her readers can put into practice immediately. It gives readers a solid foundation to move beyond Auto mode to get the best results straight out of their cameras without investing a fortune in additional equipment and software."

"It’s consistently practical, with explanations that are accessible for a novice like me. There's also a nice balance between technical explanations and creative exercises. Because it’s an ebook, I always have it with me, which is crucial for a photography book because you never know when and where you might need it. I bought a similar print book at one point, for about 5 times as much, and it basically just sits on the shelf. This is definitely the way to go."

Thank you all so much for being an active part of Boost Your Photography! Excited to celebrate this first year blogoversary and looking forward to many more to come.

Have a topic you would like to see covered on  Boost Your Photography? Leave a comment on this post or ask a question.

Subscribe to our mailing list

* indicates required


How would you like to receive updates? *


Follow along on Facebook

Follow along on Google+

Follow along on Twitter

Follow along on Pinterest

Follow along on Bloglovin'

Wednesday, March 26, 2014

Tell a Story with Easter Photographs – plus how to tie-dye eggs

Easter egg dying is a fun family tradition and a great photography subject. This post will provide examples of how to tell a story with Easter photographs, and as a bonus, will include how to tie-dye your own Easter eggs, courtesy of a set of directions hand-written by me as part of a second-grade school project (and yes, my handwriting really was that awesome).

Tell a Story with Easter Photographs | Boost Your Photography

Plan Ahead

First, think about the story that you want to tell beforehand. For this series, I wanted to capture the process of dying and tie-dying eggs. I also wanted to focus on hands, partially for their storytelling power, and partially because the rest of my extended family was feeling a bit camera-shy about the whole thing.

Tell a Story with Easter Photographs | Boost Your Photography

Think about the scene and the lighting. The process shots were taken at the kitchen table, next to a large window that allowed for significant natural light. Natural lighting is always preferable with this kind of lifestyle photography, and a bright sunny day should allow you to easily shoot handheld without having to raise your ISO above 100.
Easy Tie-Dye Easter Eggs | Boost Your Photography

Think Through the Story

Every family has different traditions, methods, or strategies when it comes to Easter and Easter eggs. Anticipate what those moments will be and how to capture them. For these shots, I knew that I wanted to capture the entire process from start to finish of dying and tie-dying. So, I made sure to arrange and take some intentional set-up shots showing each different step of the process.

Try to capture some before and after shots to show off the transformation. (Read more on doing the 'after' shots and see some examples with a bowl of Easter eggs in the article Easy Photography Upgrade: the tri-fold board.)

Bonus Feature:
DIY Tie-Dyed Easter Eggs

Want to create your own tie-dye Easter eggs? The supplies and process are simple, and the results are always interesting and unexpected.

What you need:
  • Eggs to dye
  • Your preferred dye
  • Cups to hold dye
  • Six-inch squares of thin white cloth
  • Small rubber bands or twist ties

That's it! You can use hardboiled eggs or blow the whites out of raw eggs, if you want to keep the tie-dyed eggs from year to year. (You may want to dye the raw eggs first and then empty the insides, as an empty egg shell will need to be held down in the dye.)

Wrap the egg like a cylinder with the cloth square. Twist the ends closed and secure with rubber bands or twist ties. Choose two different colors of dye to use. Dip the egg and cloth entirely in the lighter color of dye for about three minutes. Be sure that everything gets covered in dye.

After three minutes, carefully remove the wrapped egg. (You may want to squeeze excess dye out of the edges of the cloth.) Then dip the wrapped egg into the darker colored dye for a minute and a half to two minutes. Remove from the dye and squeeze out the edges of the cloth. Place the still-wrapped egg in a carton or other container, and store overnight in the fridge.

The next day, when the cloth is dry to the touch, you can unwrap the egg and reveal the tie-dye pattern. You can even run the cloth wraps through the washing machine and reuse them year after year.

Tie-dye Easter eggs are a fun activity, and the surprise of the reveal is always exciting. Do you have a special Easter egg family tradition? Share a link or photo in the comments below.

Want more great ideas? Follow Boost Your Photography on Pinterest: Boost Your Photography