Wednesday, September 11, 2013

Aperture and the F/Stop Conundrum

When I first upgraded to my DSLR camera and started using it extensively, I found myself facing a whole variety of problems, and for many of them, I couldn’t find easy solutions online or in any of my beginning photography books. I realized much later that some of these problems were so basic and fundamental that experts who had been shooting for a long time had likely forgotten that they had ever not known how to do such things.
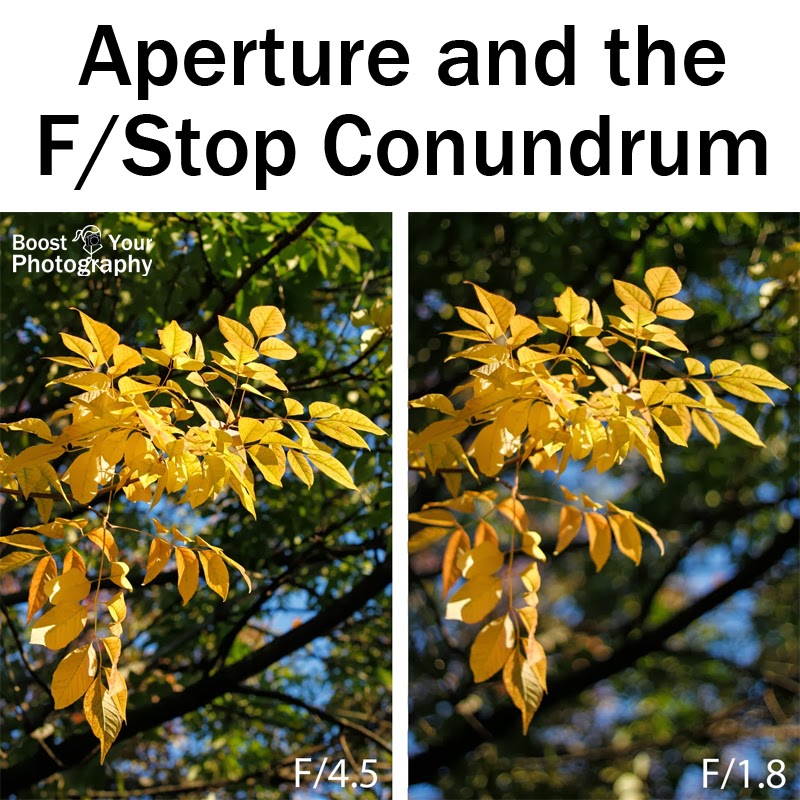
Aperture and the F/Stop Conundrum | Boost Your Photography

This is another article in an occasional series aimed at beginners called “Things Experts Forgot to Tell You” or “Things that You Forgot you had to Learn.” (Previous articles include Why Won’t My Lens Focus?, All about Exposure, and More about Exposure: how to fix common exposure problems.) Maybe you’ve just purchased your first DSLR camera or perhaps you’ve had one sitting around for awhile that you’ve been meaning to start using.  The next big steps are getting out there, figuring out what you and your camera are capable of, and learning where to get answers to your questions. While the first two steps are up to you, this series is an attempt to briefly cover some of the questions that might not have yet occurred to you to ask.


Aperture controls how much of your image is in focus. These leaves were shot at f/3.8.
Fall Leaves at F/3.8 by Archaeofrog on Flickr

Aperture, F/Stops, and the Difficulty of Talking about Fractions

Aperture is a value, expressed in a unit called f/stops, that refers to the relative size of the opening of your lens when you take a photograph. The bigger the opening, the more light that your camera lets in and the smaller the depth of field (the area of the subject in focus). The smaller the opening, the less light that you camera lets in, but the greater the depth of field (the more of your image that will be in focus). There was a brief discussion of the impact of aperture in the article Remember the Background and Move Your Feet.
Crab Apples at f/1.8 (left) and Close-Up Rose at f/22 (right)
In the images above, the left-hand image of the crab apple blossoms was shot with a wide aperture (f/1.8), which resulted in a very narrow slice of the photograph being in focus. As the further back flowers rapidly fall out of focus, the light on the very background flowers becomes merely giant circles or bokeh as they are known in photography. The right-hand image of the rose was shot with a narrow aperture (f/22), which resulted in the depth of field (the area in focus) extending through the entire image.

Here's what kept me confused about aperture for the longest time when I started getting serious about my photography and particularly when I started reading a lot of books and articles about photography: the terminology for aperture seemed hopelessly muddled. This is where the fractions come into play. (Now, don't get me wrong. My mother is a math teacher, and I have no problems with fractions, per se, but they definitely interfered with my reading of photography books in this instance.)

The f/stop number is actually a fraction, so you can think of the ones used in the example above as 1/1.8 and 1/22 instead.  Translate those into decimals, and you have 0.5 (repeating forever) and 0.045 (repeating 45 forever). This means that f/1.8 is actually a 'larger' number than f/22, even though intuitively you would look at them and assume that 22 is a 'larger' number than 1.8. So, when I was reading about larger or smaller apertures, I kept confusing that with what I was reading about wider or narrower apertures. Here it is restated as bullet points just to make it obvious.
  • F/1.8 A larger aperture value (larger fraction) = a wider opening = more light coming in = shallower depth of field (much less in focus) and a faster relative shutter speed
  • F/22 A small aperture value (smaller fraction) = a narrower opening = less light coming in = a wider depth of field (much more in focus) and a slower relative shutter speed
These two shots were taken consecutively at f/1.8 (left) and then f/18 (right). This close to a subject at f/1.8, the depth of field is limited to the front rim of the spoon and the row of stars directly underneath.
Patriotic Spoon Reflection by Archaeofrog on Flickr
What eventually helped me was just to focus on remembering what each aperture could do for me, photographically, and keep it at that.  All the larger/wider/smaller/narrower was just too much. If you understand what each end of the aperture spectrum can do for you, you will be well on your way for using aperture to achieve the look you want in your photographs.

Try It Out

Set your lens to aperture priority mode. (You will choose the aperture, and the camera will choose the shutter speed. Keep your ISO at 100.) Pick a subject and take two photographs: one with the aperture wide open (f/1.8 or as close as you can get) and another with a narrow aperture (f/22). Compare the two images. Think about whether one aperture better fit the subject you had chosen and why.

Stay tuned to continue our exploration of aperture with a discussion of what f/1.8 can do for you, what f/22 can do for you, and what about the rest? or check out more posts geared towards beginners. Click 'For Beginners' up at the top or try the rest of our series, Camera Settings and Strategies:


Want to learn more? Boost Your Photography: Learn Your DSLR is now available from Amazon. Get the most out of your camera with practical advice about the technical and creative aspects of DSLR photography that will have you taking beautiful pictures right away.

Sunday, September 8, 2013

Zooming vs. Cropping: perspective in photography

One of the most basic decisions when taking a photograph is what to include within the frame, and countless books, articles, and blog posts have been written about composition within that frame. But one often overlooked aspect of this discussion is the difference between zooming and cropping when getting to the final composition.

A wide shot in the process of being cropped down to a closer-in shot.

Zooming, of course, is changing the length of your lens to create the final composition (whether on a point-and-shoot, DSLR, or any camera in-between). Zooming happens in the field, while you are taking a photograph. Cropping, on the other hand, is changing the photograph itself, after it has been taken, by selecting a smaller section of the original photograph to make the final image. Zooming happens with your lens or with your feet; cropping happens on your computer.

The distinction matters for several reasons. One is that cropping decreases the amount of pixels in your final image, which can impact how well you can blow up and display or print the final image. The second is that how you choose your zoom (based on where you stand) impacts the perspective of the final photograph, while cropping does not. Wide angle lenses (or wide focal lengths) tend to expand and distort perspective, while zoom lenses (and narrower focal lengths) tend to compress a scene and make objects seem relatively closer together. These different focal lengths can greatly change the perspective of your scene.

Why does changing perspective matter? Let me illustrate with an example.

I recently retired my car. After fifteen years and nearly 150,000 miles, it was time to start seriously considering a different car before the next winter set in. Decisions were made, and the weekend came to say goodbye to my old car. As a goodbye, I decided to take it for a last spin and photo shoot down by the lake.

I wanted to take a 'car portrait' with the lake and trees as the backdrop, so I decided to take a series of shots at different zoom lengths to see which one offered the best perspective. To accomplish this, I had to zoom with my lens as well as my feet. For the first image, at 18 mm (the widest focal length for the lens I was using), I was standing very close to the car, slightly in the road itself. For the 35 mm shot, I had to back up to just across the road. This gave me the same compositional placement as the first shot (with the car the same approximate size within the frame). Then I repeated the process of backing up and taking another picture at 50, 100, 150, 200, and 270 mm (the maximum zoom amount for the lens I was using).

Zooming Vs. Cropping: perspective in photography | Boost Your Photography
Impact of changing focal length (and backing up) on perspective.

This collage shows six of those images, each shot at the same ISO (100) and aperture (f/16). The top row of shots was shot at a shutter speed of 1/100th of a second, and the bottom row of shots was shot at 1/60th of a second (to make the darker tree backdrop a little lighter). The differences between each of the shots are purely a result of the changing perspective from each of the different focal lengths.

Comparison of 18 mm and 35 mm focal lengths on perspective

The differences are quite apparent when comparing the widest shot, 18 mm, with the next widest shot, 35 mm. The 35 mm length is considered to be most similar to the view and perspective that is captured by our eyes, and this photograph matches how the car 'naturally' looked to me at the time. The wider 18 mm view creates distortion in closer objects, which exaggerates the lines of the front of the car in particular. This view of cars is often used to make them seem large, grand, or imposing, as the car seems to dominate over the wide views in the background.

This distortion of objects at wide focal lengths can create problems when photographing portraits. While a distorted look is common in photographs of cars, a wide angle and up-close photograph of a person is far less flattering and tends to over-emphasize features, making noses look large or faces look wide. This is why lens in the 85-120 mm lengths are often referred to as 'portrait' lenses: these focal lengths give a perspective of the human face that is considered more flattering.

But back to the discussion of cropping. While I can crop an image I took from farther away to make it look like I was standing closer to that object or using a longer zoom, cropping cannot replicate the changes in perspective from actually standing closer to that object.

Same image file, as originally shot (left) and cropped down (right)

The photograph on the left was taken with the 18 mm focal length while I was standing at the same location as the 270 mm version with the car in the same relative position in the frame as in the series above. The photograph on the right was cropped from the photograph on the left to create the same relative position and size of the car in the frame.

Comparison of 270 mm shot (left) and 18 mm shot from same location, cropped (right)

This image compares the zoomed in shot at 270 mm (on the left) with the shot cropped in version from the 18 mm to imitate the composition of the 270 mm shot (on the right). The loss of pixels and therefore clarity and detail is evident between the two. The 270 mm shot is 4752 x 3168 pixels, while the cropped version is only 357 x 238 pixels. You should also notice that the perspective between the two shots is unchanged. Cropping in a shot does not change the perspective of the shot. Only zooming in or out for the shot and moving your feet changes the perspective.

Comparison of 35 mm and 270 mm focal lengths on perspective

Standing in one location (such as where I took the 270 mm shot) and changing the zoom on your lens will make photographs that are different. It will not, however, make photographs that have any differences in perspective. The relative locations and impact of the foreground and the background will remain the same. If you want to change the perspective, if you want to emphasize one object over another or influence their relationships to each other, you will need to change your zoom and move your feet.

Moving your feet can impact your photography in many ways. Read up on aperture and how moving your feet can improve your shots here: Remember the Background and Move your Feet.

Wednesday, September 4, 2013

Window on the World

Windows can be great subjects for photography. The inclusion of the frame of the window draws your viewers into the image and encourages them to place themselves in that particular scene. The camera and the window become a proxy for the viewer.

View towards the garden from a Berlin, Germany apartment.


Why Windows?

Windows are also a way of providing contrast in a photograph: between what is inside and what is outside, what is included in the view and what is excluded, etc. A warm interior can be enhanced by a hint of the winter's day outside, while a child's face at a window can contrast with those playing outside. In the image above, the plants inside and the plants outside provide an interesting contrast to each other.

Light beams through skylight windows

Windows can be important sources of light and ambiance. Here, these skylights provide the piercing beams of light that illuminate this interior room in Ajloun Castle (Qal'at ar-Rabadh) a Crusades-era fortress in Jordan.

View from the stairway of the Astronomical Tower in Prague

Windows can also provide interesting compositional shapes or frames for images. By constricting the view, they force the eye to consider the composition within the frame provided. The unusual oval shape of this window provides an interesting contrast with the straight lines and squared corners of the Tyn Church and the Old Town Square in Prague, Czech Republic.

Window used in the Second Defenestration of Prague

Windows can tell a story or belong to an important moment in history. This window entered history books in 1618 as the location of the Second Defenestration of Prague. During the uprising, the two royal governors and their scribe were thrown out the window but miraculously survived the fall. This event, however, marked the beginning of the Thirty Years War. (Yes, we have a word in English specifically to mark the throwing of people or objects out of windows! It comes from the Latin preposition de (down or down from) and fenestram (window).)

Window looking into a courtyard of Balcony House

Windows can also connect us to people in distance places or distant times. By putting ourselves in their shoes and by sharing their view, we can get a glimpse of another lifestyle or worldview. The window above overlooks a courtyard in the Ancestral Puebloan community of Balcony House at Mesa Verde National Park in southwestern Colorado. Despite the hundreds of years of time, we can image what it would be like to have lived in such a community and to have had that view.

Sometimes you are the one being watched from the window!

Don't forget that windows can also have occupants. This kitten is watching the comings and goings of the hotel guests from her perch overlooking the walkway.

Tips for Photographing Windows

It can be difficult to properly expose for a scene that includes a window. Depending on the lighting, you may have to choose whether to expose for the scene through the window or for the scene around the window. You may want to choose the spot metering option on your camera to choose a smaller area of the image to have the camera use to calculate its recommended exposure values. (See more about Exposure by reading All About Exposure and More on Exposure: how to fix common exposure problems .) Remember to use a narrow aperture (such as f/22) if you want both the foreground (the window and frame) and the background (view through the window) to be in focus.

View towards San Francisco from Alcatraz

For the window shot above, which was taken at Alcatraz prison, I wanted to highlight the view through the window of the nearby, but still unreachable, skyline of downtown San Francisco. The details of the cell itself were not as important, and the underexposed blackness further provides a contrast between the world without and the world within.

View of the Grand Tetons from Cunningham Cabin

You can also use flash or additional lighting to try and balance out the differences in lighting between the inside and outside of the window.  For this view through the window of the Cunningham Cabin out towards the Tetons, I wanted to include the details in the wood of this historic building as well as the sunset vista. I chose the shutter speed and aperture values based on the view through the window and then used the flash to briefly illuminate the cabin during the exposure.

Summary

Windows can be an endlessly interesting photographic subject. By constraining the view, they can lend an air of mystery to an image. By inviting us to look at them, they draw us as viewers into the image and allow us to make connections to the location or the occupants. They are also useful compositional tools and can provide light and drama to a scene. Next time you are feeling stuck and need some photography inspiration, try a window!

Preserved pattern of a window shutter from the Villa of the Mysteries near Pompeii, Italy

Saturday, August 31, 2013

Panning in Photography

Panning is a photographic technique involving subjects in motion, where the subject is captured crisply but the background becomes a blur. This affect is achieved by moving the camera while taking the picture and matching the motion of the camera with that of the subject.

Panning in Photography | Boost Your Photography, panning, photography, motion, blur, ICM, intentional camera movement

Settings for Panning

Panning is a technique that requires practice and a steady hand. Some prefer to use a tripod to achieve a smooth movement, but I prefer to handhold the camera, which gives me free range of motion and the flexibility to adapt to the scene as it develops.

Since your subject (and the camera itself) will be moving, it can be difficult for the camera to maintain autofocus when panning. A good strategy is to use what street photographers call
'zone focusing' to set a manual focus point. With zone focusing, you choose an object at about the same distance as you expect your subject, set your focus on that object, and turn off autofocus. Your camera will remain focused at that distance, and your subject will be in focus if it is about the same distance away as the object you chose.

Panning Photography
You can see the blurred foreground outline of the tree that I used to set the focus for these panning shots.

For example, in the photograph above, I used a tree in the median to set the focus. Because I used a middle-of-the-range aperture (here, f/8 but the range of f/8 to f/11 works well) I knew that any bike coming down the street would be within the depth of field (area in focus) of the camera. The shutter speed of 1/6th of a second allowed for sufficient blur when moving the camera at the same speed of the biker.

A successful panning shot needs a long enough shutter speed to create the background blur. For a slower moving subject, such as a leisurely biker, a shutter speed of 1/20 to 1/6 th of a second will create blur, while with a faster biker you may be able to use a faster shutter like 1/40 or 1/100 th of a second. You can use an even quicker shutter speed for very fast objects like motorbikes, race cars, or fleeing animals.

Finding the correct combination of aperture and shutter speed will depend on both the speed of your subject and the lighting. (I recommend keeping your ISO as low as possible, such as ISO 100.) Begin with shutter priority, using the shutter guidelines above, and take a few test shots. If you have a hard time keeping the subject in focus the whole time, try a faster shutter speed. If you have a hard time seeing enough motion blur in the background, try for a longer shutter speed.

Techniques for Panning

The trick for panning is that you must be moving the camera at the same relative speed as the subject. Panning works best for subjects where the movement is perpendicular to your position, such as a car or biker going past on a road, while you are standing facing out across that road. You can also think of it as moving parallel to the plane of the photograph. Panning an object that is moving directly towards or away from you (straight on) is much more difficult.

Panning Photography of Cyclists Biking
Here, the slight curve to the background motion is because I was 'swooping' the camera rather than smoothly rotating.
In order to achieve the panning effect, you must be moving/rotating the camera smoothly at the same speed as the moving subject. You need to be able to push the shutter while following the subject in your viewfinder. Just like with your golf swing, it's all in the follow through: you want to be moving the camera before you hit the shutter and keep moving the camera and following the subject after you have hit the shutter. (Yes, full disclosure, I was on the golf team in high school.)

Another trick for keeping the subject crisp when panning a bicyclist is to find a location where the biker is coasting. If the biker is peddling, the legs will blur, even if you are able to pan the bike crisply. A peddling biker can add to the feeling of motion, but a completely still-looking biker can make the panning effect even more dramatic.

Panning Photography of Cyclists Biking
Here, panning highlights the contrast between the still and moving bikers.

Look for background interest when choosing your location for panning. In the image above, the still biker adds greatly to the feeling of motion when compared to the moving bikers. Bright colors or other contrasts can also add impact to your shot.

And that's the nuts and bolts of it. The main thing is to practice. You want to be able to keep your subject in the same place in your viewfinder while moving your camera smoothly. Keep an eye out for biking events or races, which would give you a wide range of subjects and many opportunities to practice.

Keep an eye out for interesting subjects!

Wednesday, August 28, 2013

Summer Round Up

With Back-to-School in full swing (or just around the corner, perhaps), it's time for our Summer Round Up: your one-stop spot for a look back at this summer's posts. Catch up on the Spring Round Up here.
Stacking Photographs: beyond star trails
For Beginners: explanations and overviews geared towards those wanting to get more out of their photography. Many of the 'tips and tricks' and 'inspired ideas' are also applicable.
All about Exposure
Tips and Tricks: advice for getting the most of your camera and photography
Easy Photography Upgrade: the tri-fold board
Inspired Ideas: how to make the shot with specific photography ideas

Travel Photography

Travel Photography Must Haves
August Photography Book Club

Stay Connected: don't miss a single post from Archaeofrog Photography

Saturday, August 24, 2013

August Photography Book Club: week 4

It's the fourth and final week of the  August Photography Book Club and our study of Freeman Patterson's Photography and the Art of Seeing. I know this is a busy time for many of us, but I hope you will still read and participate as you are able. Catch up by reading any of the following or just jump right in from here.
If you don't have access to a copy of the book, you can still join in by participating in the exercises and reflections below. If you do have the book, you'll have a lot more material to draw upon and work with.
Exploring the impact of shutter speed by panning while shooting. Panning Experiment by Archaeofrog on Flickr.
To see more what others have been coming up with, take a look at the photographs on the Flickr group page or tagged bookclub-seeing1, bookclub-seeing2, or bookclub-seeing3.

Week 4 will focus on the last sections in the book: Elements of Visual Design: Color, Principles of Visual Design, Working with Visual Design, and Photography and the Art of Seeing.sBelow, I've provided a few quotations that struck me from these sections and some suggestions for exercises. (All page numbers refer to the 2011 edition, and I've kept his Canadian spellings when quoting.)

Elements of Visual Design: color
This section continues the discussion of tone from last time and adds the element of color and the connection between color and emotional response. Patterson continues to emphasize the process of identifying a reason for an image, choosing a subject matter to express that theme, and now, considering the placement and size of the color(s). He also discusses how color can express time or harmony, and how colors are often perceived in relation to the other colors present.

"There is no 'correct' way to render the colours in this picture, but some ways will lead to more effective expression than others. Let your technique be determined by what needs to be expressed rather than by technical goals such as a search for colour harmony" (pg. 114).

He suggests an exercise in self-evaluation: "examine some of your old photographs. Try to determine the elements of visual design that have influenced you the most" (pg. 115). Then, challenge yourself to try something different: a series of monochromatic shots focusing on tones or of black-and-white images or of muted, monochromatic color or ...
Monochromatic take on snow. (This is actually a color image.) Winter Monochrome by Archaeofrog on Flickr
Principles of and Working with Visual Design
Patterson offers a theory of visual design centered on two main principles – simplicity and dynamics (tension) – and five secondary principles – dominance, balance, proportion, pattern and rhythm, and deformation (or distortion). He explains briefly about each of these major and minor principles, some ways to achieve them, and some ways to change and manipulate them.

About tension: "Our normal visual experience is dynamic, because the tension between the colours, shapes, sizes, and locations of things keeps our eyes constantly moving. Photographers control tension by the way they balance objects in the picture space" (pg. 119).

You can explore deformation by experimenting with how different lenses (and/or different focal lengths) influence the perspective of the final image. Choose a subject matter and photograph it with a wide angle lens, making sure the subject occupies a significant portion of the image. Now, zoom out to 50 mm (or switch lenses) and back up from your subject until it occupies roughly the same portion of the image. Take another image. (I suggest shooting in aperture priority mode to keep your aperture the same in all images.) Now zoom out to 100 mm, continue to back up and recompose, and shoot again. Continue zooming out and backing up until you have reached your longest zoom. Take some time to compare and evaluate your images. How have the images changed compared to each other? How has your subject become more or less deformed? Do you have a favorite of the series and why?
New Zealand Milford Sound, framing
Branches or other natural objects can create a 'frame' within your photograph that focuses the eye and emphasizes your subject. Milford Sound, New Zealand by Archaeofrog on Flickr
Patterson also suggests several guidelines to consider when applying the principles of visual design to a given situation. He asks us as photographers to consider the center of interest, the base, whether to fill the picture space, how and when to use a frame or a window, when to use a lack of perspective to our advantage, when to consider 'amputating' your subject, why we should concern ourselves only with 'appropriate color,' a reminder to consider exposure, and the importance of symbolism. Each of these topics could be the subject of a photographic exploration. Choose one (or more) to focus in on and see how it influences your photography. The series of photographs that follows this section offers additional ideas about some of these principles and guidelines.

Photography and the Art of Seeing
The last section in the book is more an application than a summary of all the points presented throughout. Patterson shares his own experiences with participating in some of the same challenges he has offered his students and his readers. (In the 2011 edition this includes spending an afternoon photographing a white plastic chair and playing with light in glassware, while the earliest editions include a study of a gravel quarry.) Find a similar object or subject or situation and see what you can come up with, now that you have this book and its lessons in mind.

Multiple Ways to Join the Book Club
Want to participate? Post a comment with your thoughts or a link to a picture you've taken for the Book Club and an explanation of how the book influenced your image. Or, you can post pictures and contribute to the discussion by joining the Photography Book Club Group on Flickr.

Parting words for the week: "Having made hundreds of compositions by the end of the afternoon, I realized that I had really only begun. That often happens when you play – one thing simply leads to another. There's no better way to learn. That's why we are all children first" (pg. 147).

Saturday, August 17, 2013

August Photography Book Club: week 3

It's week 3 of the August Photography Book Club and our study of Freeman Patterson's Photography and the Art of Seeing. Catch up by reading any of the following or just jump right in from here.
If you don't have access to a copy of the book, you can still join in by participating in the exercises and reflections below. If you do have the book, you'll have a lot more material to draw upon and work with.
Inviting by Archaeofrog on Flickr
Taken for week 2's concept of starting from a theme or idea and then seeking out a subject matter to express that theme.
To see more what others have been coming up with, take a look at the photographs on the Flickr group page or tagged bookclub-seeing1 and bookclub-seeing2.

Week 3 will focus on several smaller sections in the book: Unique properties of photography, How a camera sees space, Thinking about Visual Design, and Elements of Visual Design: Tone. Below, I've provided a few quotations that struck me from these sections and some suggestions for exercises. (All page numbers refer to the 2011 edition.)

Unique Properties of Photography and How a Camera Sees Space
Patterson begins by comparing and contrasting photography to other art forms, both two-dimensional and three-dimensional, and draws up a list of what he calls the "six fundamental characteristics of the photographic medium that distinguish it from other visual media" (pg. 83). These can be roughly summarized as
  1. With photography, you have "an already existing object in front of your lens" (pg. 84).
  2. "Photography has the capacity to render detail with a precision no other visual medium can match" (pg. 84).
  3. Photographers must act with the right timing for the moment or the image.
  4. Photographers have the potential to 'stop the world' with the speed of their exposures.
  5. Photography has a "special connection with chance" (pg. 85) but can still prepare to 'be lucky.'
  6. Photography is dependent on light. "One might say that a photographer paints with light" (pg. 86).
Patterson then moves into a discussion of how a camera can perceive a scene differently that we do with our eyes and warns that photographers must "be sensitive to any elements that will not be recorded as the eye perceives them" (pg. 88).
Using a slow shutter with a light source like the steel wool here allows you to capture a moment unlike what your eyes would be able to perceive. Read more about How to Spin Fire with Steel Wool.
Try to exploit one or more of these fundamental characteristics this week in your photography. See how 'stopping the world' (using a fast shutter speed) can change your perception of a scene or contrast with how you saw it with your eyes. (Here are some examples from the recent technique challenge of fast shutter speed.)
Using a fast shutter allows you to freeze a moment in time that you couldn't observe quickly enough with your eyes. Carefully timing and a healthy dose of luck captured this huge drop just as it fell.
Falling Water Drip Reflection by Archaeofrog on Flickr
Or, experiment with shooting fast moving or rapidly changing subjects in burst mode (several pictures at once). Take some time to sit down and analyze each image. Does one stand out as a better 'lucky' capture than another? What can you learn from that about capturing exactly the moment in only one shot?

Thinking about Visual Design and Tone
"A photographer works with two kinds of visual design – the design she [or he] observes in her [his] subject matter, and the design she [he] creates in her [his] photograph by the way she [he] arranges the subject matter" (pg. 101).

Patterson differentiates between ornamentation (frills and extras) and design (intention in composition) and challenges us to simplify our images by questioning the necessity of what we have decided to include in the frame. Try to draw this distinction in your own photographs this week. Can you eliminate the 'ornaments' to focus purely on the design? Share what you changed when trying this approach (or even a 'before' and 'after' comparison). What did you eliminate and why?

Patterson's section on tone focuses in on light, including both the quality (harshness or softness) and the direction (frontlighting, sidelighting, and backlighting) of that light. Light is then discussed in its relationship to line, shape, texture, and perspective. Try to experiment with light this week. Take a series of pictures changing the direction of the light (front, side, and back) by either moving your light source or moving yourself. See how this changes your image. Or, explore the idea of perspective: play with changing sharpness, relative size, relative location, or the obliqueness of objects in your photographs to see how their visual relationships change. You could even try a 'forced perspective' shot or an optical illusion by manipulating these relationships.
This photograph shows the impact of side lighting: harsh shadows and lack of detail on the unlit side.
One Light Portrait, Side Lighting by Archaeofrog on Flickr
Multiple Ways to Join the Book Club
Want to participate? Post a comment with your thoughts or a link to a picture you've taken for the Book Club and an explanation of how the book influenced your image. Or, you can post pictures and contribute to the discussion by joining the Photography Book Club Group on Flickr.

Parting words for the week: "Critics who scorn the 'lucky' chance of a photographer are suggesting an accident takes place when a photographer captures a unique event that lasts for only a moment, but it is no accident if the photographer anticipates the event and knows how to use his [or her] tools … A photographer has to hope for and prepare for 'lucky' chance" (pg. 85).