Wednesday, April 30, 2014

BYP: 52 Weeks Challenge

May is a month of new beginnings and new growth. Why not also make it a month of new beginnings and new growth in your photography? A constant refrain that I hear in feedback and in comments is that people "Wish I knew more about camera" or "Need to get out and use my camera more." Why not make a commitment to yourself to start something new?

I have written previously about doing a 365 Project (taking at least one photograph a day for a full year) but that can be an intimidating commitment. Why not step in more gradually and try committing to a 52 weeks project?

#BYP52weeks: Join the 52 Weeks Challenge on Boost Your Photography

What is a 52 Weeks Project?

A 52 weeks project is a year-long commitment to taking and sharing at least one photograph a week. This size of personal project is a great balance between giving yourself the push and motivation to pursue photography and the flexibility to make it achievable. While you only have to take photos once a week, you will likely find yourself inspired and encouraged to try even more. (All cameras / phones / levels of experience welcome!)

Interested? Join in at the Boost Your Photography: 52 Weeks Challenge Google+ Community and use the hashtag #BYP52weeks! I've put together a list of "suggested" weekly topics to start us off, as I know some people like a little more direction and guidance than 'take a picture and share.'

The dates are simply a guideline for posting, starting each week out on a Monday. Personally, my plan is to take my photograph for the week sometime before the deadline and then to post my photographs to the group on Sundays, which suits my schedule. I would still plan on checking in with the group and adding comments during the rest of the week too. The thought is that you could post your "Focus" week photographs anytime from May 4-10th. (You are always welcome to simply share a photograph each week, whether it fits the "theme" or not.) The idea is to get out there shooting and get involved with a community that will encourage and motivate you.

Want to improve your focus for week 1? Read Why Won't My Lens Focus for some guidance and ideas.

Will You Join the Challenge?

I would love to see this grow into something exciting and inspirational! I hope you will consider taking the next step in your photography process and joining the challenge. See you soon at the Boost Your Photography: 52 Weeks Challenge!

Monday, April 28, 2014

A Year Ago on Boost Your Photography

This was a great two weeks from last year: this iteration of A Year Ago on Boost Your Photography includes two of the top five articles of 2013. Enjoy!

2013:

Spinning Fire with Steel Wool Photography | Boost Your Photography

  • Spinning Fire with Steel Wool Photography. It's easy to capture amazing photographs with steel wool spinning. This article will walk you through all that you need to do to creative these types of photographs safely and easily (even with a point-and-shoot camera)!
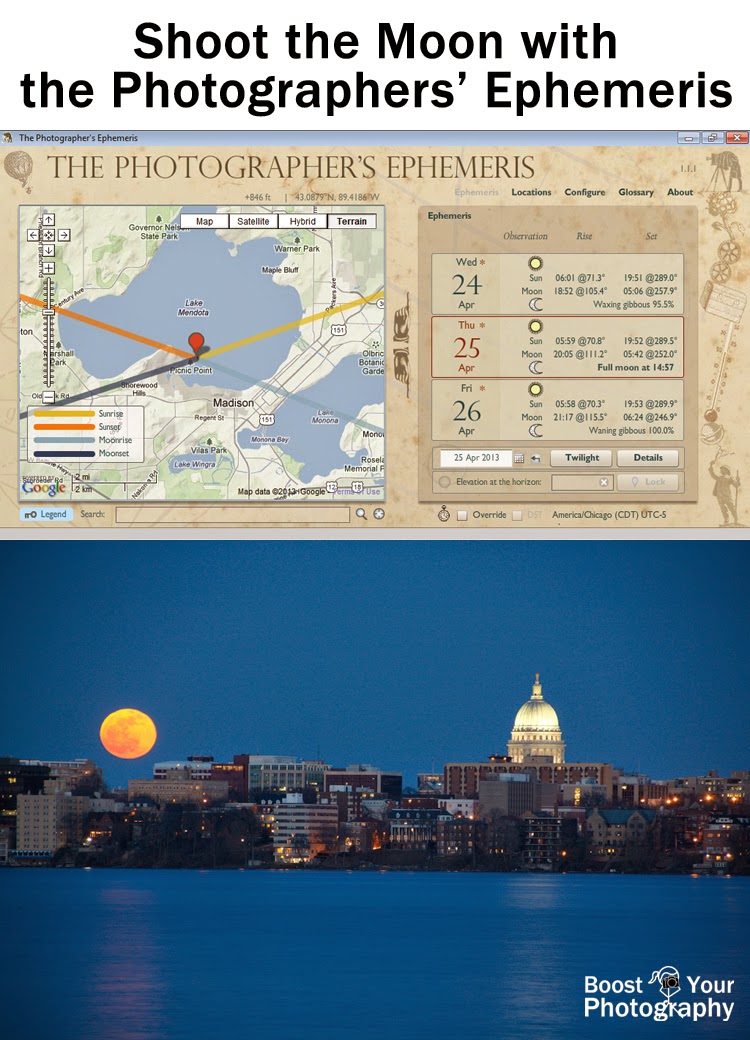
Shoot the Moon with the Photographer's Ephemeris | Boost Your Photography

Cheap and Easy Macro: Comparisons and Recommendations | Boost Your Photography

  • Cheap and Easy Macro: Comparisons and Recommendations. This summary article provides a quick overview of the most common, inexpensive ways to capture macro photographs, along with links to all the detailed articles about each method. The final head-to-head comparison will help you decide which method(s) may work best for you.

Don't Miss a Single Post from Boost Your Photography

Follow along on Facebook

Follow along on Google+

Follow along on Twitter

Follow along on Pinterest

Follow along on Bloglovin'

Or, better yet, receive updates daily or weekly via email. Sign up below!

Subscribe to our mailing list

* indicates required


How would you like to receive updates? *


Saturday, April 26, 2014

Better Before / After Photographs

Looking to showcase a big project or a total transformation? Read on to find out how to take better before and after photographs to really highlight what you have accomplished!

Better "Before" Photographs:
Plan for great light and plan your composition

The trick to getting great before and after photographs is to really nail the "before" part of the series. You will have unlimited time to work on tweaking your "after" shots, but once you have started the project, your chances for before shots are gone.

Do not follow the lead of beauty product before and after shots and take poorly lit or poorly composed before shots just so that your after shot looks "even more amazing." Your audience is smarter than that. Plan instead for great light and a well-composed before shot, so that the comparison with your after shot is all about the changes and transformation and not about manipulating your photography skills.

For interior shots, great lighting is often a combination of a sunny or brightly cloudy day combined with interior lights. Lit lamps give a photograph a feeling of warmth and makes it inviting. Avoid direct sunlight (like harsh shadows coming through a window) and opt for indirect sunlight instead. Consider closing sheer curtains or blinds to give a warm glow, while still lighting up the interior. For furniture or smaller product shots, use even lighting, like lamps or windows off to each side or a light tent for small pieces.

If shooting furniture or larger pieces, choose a composition that shows off the piece well. If you are doing a head-on shot (like, of a dresser or end table), crouch down to place your camera about mid-height and shoot straight on. If you shoot from above, looking down, your vertical lines will bow out toward the bottom, and if you shoot from too low, looking up, your vertical lines will spread out towards the top. A head-on shoot should be shot head-on to avoid these types of distortion. (Read more in Photographing Architecture: watch your lines.)

Standing in a corner / doorway will give you the widest view of the room.

If you are shooting an individual room, use a wide angle lens (like 18 mm or your point-and-shoot without zooming in) to capture as much of the room as possible, and pick an easily-repeatable place to stand. The goal would be to take your "after" shot from the exact same location and with the exact same lens and focal length as your original shot, in order from them to match up easily. For rooms, this often means finding the farthest corner or largest doorway to shoot from. (If you know that you will be placing a large piece of furniture in that location for the after, then find a different place to stand for the before.)

Finally, take a minute before your photograph to survey your final composition. Aim for simplicity and take a moment to de-clutter, even for your "before" shots. Once you know where you will be standing and what your view of the scene will be, it is a simple task to hide clutter out of the camera's view. (On the opposite side of couches is a great place to temporarily stash things like stacks of mail, tissue boxes, and other less-attractive but everyday accessories.) Take a series of "before" photographs and play with different angles and compositions, so that you have multiple options to choose from when it comes time to shoot your "after" shots.

Better "After" Photographs: repeatability is key

After your project or transformation is completed, you need to spend a little more time with your "before" photographs before jumping into shooting your "after" shots. Narrow down your shots into a few compositions that will best show off the differences that have taken place.

Once you have your best candidates selected, consider printing off copies of each before shot or having a phone or tablet with the shots on them with you. You want to be able to directly examine your "before" shots as you are working to line up and capture your "after" moments. Taking that extra moment to move yourself into the exact right position to re-shoot the shot will make a big impact when you display the two images together. Watch the edges of your composition, in particular, and try to get as close as possible to the original layout. When in doubt, shoot a slightly wider shot for your "after," so that you can crop it down to match your "before" shot exactly.

Lived-in "after" (Had I been really picky, I could have tried better to hide the computer cords.)

For the actual process of shooting your "after" shots, be sure to follow the same advice as above regarding lighting, composition, and clutter. Consider "staging" your shot by tastefully arranging accessories to better show off your final product. An updated end table will look even better shown in-place with a vase of flowers and a few small knickknacks than just as "hey, here's an end table" against a concrete wall, for example. Small touches can make a big difference in the overall look and feel of your final photograph.

Putting It All Together

The final step, of course, is putting your before and after shots together into a finished collage or at least displaying them next to each other. There are many apps and software programs that allow you to create a collage, so use one that you know and are comfortable with. (PicMonkey is a popular web-based program that has many free collage functions.)

For maximum impact, you want your before and after photographs to mimic each other as much as possible. Once you have selected which shots to pair together, take a little time to try and match them as closely as you can. If one photograph has a slightly wider composition than the other, try cropping it down to match the other. If there is something you do not like about both compositions, consider cropping both shots down to just the view that you want.


If you are making a collage (rather than just posting two individual shots), consider using one that has either a white or black border. Borders make it visually-easier to distinguish the two different shots and make the differences between the two even more obvious. Keep your border simple, like a solid color, so that it does not distract from the overall comparison.

Do you shoot and display before and after photographs? Share a link before or any tips and advice I might have missed!

Want more great ideas? Follow Boost Your Photography on Pinterest: Boost Your Photography

Thursday, April 24, 2014

Google+ Growing Circles Hop (I'm Co-Hosting!)

Is it Thursday again already? Yes, it is! That means it's party time.


Welcome to the Google Plus Growing Circles Hop, where we network and share content all day long every Thursday.


Interested in Co-Hosting?
Send an email to 2justByou(AT)gmail(DOT)com with "G+ Hop Co-Host" in the subject line and include your blog and G+ links for consideration. We'd love to have you!


To make the most of this link party, please follow the rules below.
1. You MUST add your hosts and co-hosts to one of your circles before linking up. 
2. Link up your personal Google+ profile, blog or business G+ pages but NOT your blog URL. 
3. Share ONE post ONLY - (new or old) on G+ and use the hashtag #GrowingCirclesHop
4. Connect with others by clicking on your #growingcircleshop hashtag. Engage with at least 2-3 others by a Share, +1 or Comment. 
5. Add new friends to your circles. 
6. Grab a button for your blog, if you'd like. Help us spread the word so we can keep trending on Google Plus each week! (You can edit size to fit your blog in the code).
Mommy Mentionables

Throughout the next 12 hours, check back on G+ and +1 posts with the hashtag #growingcircleshop.


Google+ Tips

The real participation comes with sharing a blog post to G+ using the party's hashtag and engaging with others who are also sharing posts from this party. Interaction and engaging with others on G+ will bring you the most success!

You will notice some posts have a very large picture associated with their post and others have a tiny picture. To increase your chances of being shared, post a photo along with your post link and NOT the tiny one that gets posted automatically with the link. The bigger and more clear your photo, the better chance of it being shared because those are the posts that G+ users want to share with their followers.


If you want to be notified the next time the Hop starts, give us your email below and we will send you a quick notification the next time it goes live.


Wednesday, April 23, 2014

What the ... White Balance?

What the ... White Balance? | Boost Your Photography

White balance is an often-overlooked aspect of photography. Many, many of us are guilty of simply adopting a "set it and forget it" approach to white balance, relying on auto white balance and our camera's ability to interpret a scene and choose an appropriate white balance. For many situations, your camera's auto white balance will do a decent job. But if you really want full creative control over your photograph, it is important to understand white balance and how to use it to truly capture the photograph that you are after.

What is White Balance?

We tend to think of light as white, even though we have all seen the science demonstration of a prism and how white light is actually the full rainbow of colors. Our eyes look at a white piece of paper, and we see it as white, whether we are standing outside in full sun, in dappled shade, or indoors under fluorescent tube lights. Our cameras, however, are less flexible.

If you take a photograph of a white piece of paper, you may find that it looks white in daylight, blue in the shade, and yellow indoors. This difference is referred to the 'color temperature' of the light, and it is measured in K or Kelvins. If you want the whites in your photograph to look white, then you need to shoot with a white balance that matches the situation of the photograph.

Canon has several different white balance options, other than Auto: Daylight (5200K), Cloudy (6000K), Shade (7000K), Tungsten (3200K), Fluorecent (4000K), Flash, and Custom. The photograph above demonstrates what each of these different white balance options look like for a single photograph.

(Quick aside: if you shoot in JPEG, white balance is an unchangeable part of the final image file. If you shoot in RAW, however, the RAW file contains information that allows you to use software, like Photoshop, to change the white balance in post-processing, while still maintaining all the original information recorded for the photograph. The sunset photograph above is a composite of all the white balance options from a single RAW file.)

Cloudy white balance works well for sunset shots.
The cloudy and shade white balance settings are considered "warmer" than daylight or tungsten, which means that they tend to bring out more orange and yellow tones in a photograph. Cloudy and shade settings can work extremely well during the 'Golden Hour,' the approximately hour-long period before-and-after sunrise and sunset, when the sun rays lend a much more golden tone to the morning or evening light. The cloudy setting is also popular with landscape photographs, as it can add a golden tone to non-golden hour photographs. Read a few landscape photography books, and you will find that many well-known landscape photographers use cloudy as their default white balance setting.

Indoor White Balance

White balance can also make a huge difference with your indoor photographs. Common sources of indoor lighting (halogens, compact fluorescents, etc.) do not contain the full spectrum of white light, like sunlight, and often impart an awkward yellow tone to indoor photographs. Knowing the type of lighting you are using allows you to choose an appropriate white balance setting, like fluorescent, to compensate for this issue.

Use White Balance to Correct for Color Cast | Boost Your Photography
Get the how to on this shot: Fizzy Photography

Think about the lighting for the particular scene you are photographing, and consider changing your white balance to match the scene at hand. Shooting indoors? Consider fluorescent. Using your on-camera flash? Consider flash. Shooting a sunrise, sunset, or other scene with golden tones? Consider cloudy or shade. Better yet? Consider shooting in RAW and adjusting your white balance to your preference.

Want to get your white balance exact? You can use a gray card to set the white balance manually. If there is enough interest, you can expect a future post on the topic of custom white balances.

Want more great ideas? Follow Boost Your Photography on Pinterest: Boost Your Photography


Boost Your Photography: Learn Your DSLR is now available from Amazon. Get the most out of your camera with practical advice about the technical and creative aspects of DSLR photography that will have you taking beautiful pictures right away.

Monday, April 21, 2014

Top Tips for Camera Memory and Storage

Photography is all about creating and saving memories. But to make sure nothing ever happens to those precious memories, be sure to follow these simple tips and links to protect and safeguard your camera and computer memory too!

Top Tips for Camera Memory and Storage | Boost Your Photography

Memory Cards

Memory cards are critical to successful photography. No memory cards, no photographs. It's that simple. No matter where I go with my camera, I always bring at least one spare memory card along.

Tip 1: Have a Spare Memory Card.
Don't have a spare memory card yet? Wondering how to choose the memory card that is right for you? The article Travel Photography Must Haves covers the basics of memory cards: style, size, speed, and brand. Read on and get your memory-card-purchasing questions answered.

Tip 2: Store Memory Cards Safely.
Digital Photography School has a recent post out about memory card maintenance and upkeep: How to Spring Clean Your Memory Cards. Now is a perfect time to make sure that your memory cards are backed up, stored properly, and easily identifiable when you need them.

Store Memory Cards Safely | Boost Your Photography
There are a wide-range of memory card holders available.

Tip 3: Reformat Memory Cards Properly.
The final tip for memory cards is to delete and reformat them properly. Deleting pictures in-camera is a slow and inefficient process. Deleting pictures while the memory card is in your computer (or via a memory card reader) is more efficient, time-wise, but still not the best option. If you want to truly clear out your memory card and have it sparkling and new for your next shoot, you want to reformat the card in-camera. After you have downloaded your photographs to your computer and backed them up in at least one other location (more on that process, below), then you should return your memory card to your camera. Find the format option in your menus and click ok. Uncheck the low level format option, if listed. (Your camera may warn you that all data will be lost, but that is precisely the point.) Reformatting your memory cards in-camera will prolong their life and utility, as well as rid them from unnecessary bits and files that can accumulate from manual deleting.

Format Memory Cards | Boost Your Photography

Storing, Backup, and Redundancy

Once your photographs are off your memory card and onto your computer, you want to take adequate measures to safely backup and store your digital files. Never rely on just one method. Use multiple, redundant methods to ensure that if one thing fails, your photographs and files are still safe.

Why and How to Tag Your Photographs | Boost Your Photography


Tip 1: Tag and Organize Your Photographs.
An important step in the process of storing and maintaining your photographs is properly organizing and tagging them from the beginning. Nothing is more frustrating that knowing you have a perfect photograph for a certain situation that you are unable to find or locate on your computer. Read the full article on Why and How to Tag Your Photographs.

Tip 2: Backup Your Photographs in Multiple, Redundant Ways.
Everyone has a tale to tell about broken hard drives or stolen computers that resulted in the loss of precious pictures and files forever. Don't let that happen to you. Backup your photographs regularly, and ensure that you use multiple, redundant methods. Read an example backup workflow in the article Backing Up Your Photos: Why and How on Photodoto.

There are RAID style hard drives that will back up files automatically. Looking for a portable hard drive to use as one backup option? Digital Photography School recently posted a review of the Western Digital My Passport Pro. Click the article title to read the full press release and review.

Finally, there are many online cloud storage solutions for backing up computers. This comprehensive article on The Verge, The best photo apps for keeping your memories in the cloud, provides a detailed head-to-head review of ten different common online solutions for photograph backups.

Backup Your Photographs in Multiple, Redundant Ways | Boost Your Photography
Read the full article: The Best Photo Apps for Keeping Your Memories in the Cloud

Personally, I use two main methods for backing up and storing my photographs (and other computer files). The first is using two different portable hard drives. Once a month I make a new backup copy of all files and photographs on my computer and copy it over to each of the two hard drives. I usually keep the previous month's backup files as well, but delete the files from two months ago. Once the process is finished, I keep one hard drive at home and one at work. In case of an emergency like theft or fire, I will still have the other hard drive.

My second method is to burn backup DVDs of all my files and photographs once a year. This is a laborious and time-consuming process, but one that I have found helpful for piece of mind. While I do use Flickr for photo-sharing, I only upload pictures that I want to share, rather than my entire catalog.

How do you back up your photos? Have a great tip or article about it? Share your thoughts in the comments below.


Boost Your Photography: Learn Your DSLR is now available from Amazon. Get the most out of your camera with practical advice about the technical and creative aspects of DSLR photography that will have you taking beautiful pictures right away.

Saturday, April 19, 2014

Photographing Architecture: watch your lines

Architecture is a popular photography subject, and one that can be explored both right around you and when traveling. This post will cover a common problem in architecture photographs: distortion due to perspective and the focal length of your camera lens.


Problems with Perspective in Architecture

Perspective is critical in photography and perhaps no where more so than with architectural photographs. Our brains use perspective 'cues' in two-dimensional pieces, like photographs and paintings, in order to interpret the three-dimensional views represented. We are used to the idea that a road seems to get smaller as it fades off into the distance, even though we know that it is actually the same width all along. These vanishing points (the point either within or outside the image where the two lines of the road would converge) help us gauge distance and scale. But they can also be disconcerting when they create distortion in places where we expect lines to be straight.

The amount of distortion in a photograph depends on the focal length of the lens used and on how close or far you are to your subject. In a previous article, Zooming vs. Cropping: perspective in photography, I provided one series of examples about how focal length and movement can change and distort an image. Below is an architecture example comparing zooming from the same place.


Here, I took two different versions of the same picture, while standing in the same location. First, I took a wide angle view at a focal length of 18 mm, and then I took a zoomed in view at a focal length of 110 mm. When you compare the Capitol between the two pictures, you will notice that there is very little difference in the images and their relative distortion. The problems arise when you start moving and changing your focal length together.

Converging Verticals

The road fading into the distance illustrated the idea of 'converging verticals' - that vertical lines in the image appear to be getting closer together rather than being straight up-and-down. While this can work well for roads, it is not always the effect you want with architecture. The graphic below demonstrates some examples of converging verticals at different focal lengths.


For this series of photographs, I composed each image to include approximately the same composition of the Capitol building. Then, each time I changed focal lengths, I had to walk farther away until I could get the same composition. Overall, I walked about two city blocks between the nearest and farthest shots.

The distortion of the converging verticals is most apparent at the wider focal lengths. Many photographers intentionally use wide angle lenses to create this kind of vast, overwhelming feeling of size through distortion. By the time you approach 50 mm, the verticals have mostly straightened themselves out to give a more 'realistic' or standard architectural view of the building.

Watch Your Horizontals, Too

The distortion from taking a photograph of a building from up close is not limited to converging verticals. Horizontal lines can also appear significantly exaggerated, depending on your lens and location.

For this version, I have included two additional focal lengths, as the horizontal distortion is still evident around 50 mm. As with the vertical lines, the distortion is most apparent at the wider focal lengths. The side wings of the Capitol building appear to head off at much higher angles in the 18 mm photograph than in the other versions.

Because the building wings are being photographed at an angle, they will never appear completely horizontal unless I moved to one side or the other and shot them face-on. Again, as with the vertical distortion, you need to be aware of the look that you are trying to capture and either use or avoid distortion as it fits your photographic vision.

When Photographing Architecture: watch your lines

The key lesson is to keep both horizontal and vertical distortion in mind when photographing and especially when capturing architecture. If you are looking to represent a building in an accurate, less-distorted way, then you need to think about using a longer focal length (over 50 mm at least) and standing much farther away to get the composition that you want.

If you want, instead, to convey a feeling of height or soaring proportions, then using a wide angle lens and getting as close in as possible will help get that feeling across by utilizing vertical and horizontal distortion.

Neither image is 'wrong,' but you want to use distortion intentionally, rather than just clicking a quick snapshot of a famous landmark from up-close and then being disappointed when it looks awkward or unusual when you get home.

Want more great ideas? Follow Boost Your Photography on Pinterest: Boost Your Photography

Wednesday, April 16, 2014

Capture a Day in a Single Image

Looking for an incredible way to capture a favorite location or view? What about putting together a collage of all the changes in light and weather across a single day? This post will explore how best to go about creating a memorable single-day image like the one below.

(An aside: if you missed them, you can check out my shots from this week's eclipse on Facebook: https://www.facebook.com/BoostYourPhotography .)
Photograph a Day in a Single Image | Boost Your Photography
Image available for purchase.

Preparing for the Day

The first step is to choose an appropriate composition. Think about a location that will be impacted by both the rising and setting sun and one that will highlight the various transitions of the sun and sky throughout the day. You also want to choose a location that is easily accessible for you. The more times that you can visit and photograph the location through the day, the more options (and more potential slices) you will have to choose from.

As far as equipment, I strongly recommend using a tripod for these type of shots. A tripod will allow you to set up in approximately the same location and height each time, which will make it significantly easier to create the final merged image. (Read here How to Maximize Your Tripod.)

When I shot the series of photographs for the cityscape, above, I used the "high-tech" method of laying down a series of 'x marks the spot' sticks at the exact location of each leg of my tripod. Since I was shooting in a city park, this seemed like an easy and unobtrusive way of knowing exactly where to put my tripod each time I came back to shoot during the day.


Don't have a tripod? Just mark where you stood and then shoot from eye level. The series of three shots above were done free-hand using my point-and-shoot camera.

How to Photograph a Series of Day Shots

Once you have your location chosen, you will want to stake out a good day to take the photographs. Watch the weather, and find a day that will fit well with your schedule. Days with some cloud cover are ideal, as clouds add an extra dynamic to landscape shots. You want to arrive on location and set up before or during sunrise to get the earliest shots for your series. Consider using a program like The Photographer's Ephemeris to plot out exact sunrise and sunset times and locations.

The settings you use will ultimately depend on your scene and situation. I knew that with these landscape-style shots I wanted to maximize the depth of field. Because I was using a tripod for all shots, it also did not matter how long the shutter speed needed to be. So, I chose to shoot the majority of these shots in Aperture Priority Mode (A or Av) at f/22 and ISO 100. I also shot using Exposure Compensation and bracketing at plus-and-minus one stop in order to get a range of lighter and darker versions of each composition. (Questions about any of those settings? Read more about Aperture and the F/Stop Conundrum or All about Exposure or Troubleshooting Your Exposure.) The forest series was shot with my point-and-shoot using Program mode at ISO 100 and letting the camera choose the settings.

As mentioned already, I used a series of sticks to mark out the exact location of my tripod, so that I could be sure of shooting the same composition each time. After shooting the wide view of the scene (as used for the opening image), I also zoomed in and shot a 9-shot panorama version of the scene, to capture greater detail and record more pixels for potential larger prints.


Return as many times as possible during the day to photograph your scene. As it gets towards evening, plan on staying around and capturing the sunset, twilight, and evening shots all together. There is only about twenty minutes of elapsed time between the last two shots of my cityscape, for example. (Switch to Tungsten white balance for your deep evening shots to really accentuate the blues.)

Post-Processing: Creating the Collage

The final step is choosing your series of favorite shots and assembling the collage. The instructions below rely on Adobe Photoshop, but other collage programs or apps could also work.

First, select the entire series of photographs that you are planning to use, and copy and paste them into the same file. Then, select all of the photographs and choose the Edit -> Auto Align Layers option. I use the Auto setting. This will align all of the photographs together, eliminating any differences from your aim, composition, etc.

Auto-Aligning Layers in Photoshop | Boost Your Photography
Auto-Aligning the Layers will leave gaps along the edges where individual images do not overlap.

Use the crop tool to create your final composition. (Generally, aligning the layers will mean that there are now some gaps along the edges of certain images.) Think about the aspect ratio of your final shot before you crop: do you want to keep it as a 4x6 or an 8x10 or widescreen? (Read more about Aspect Ratio: Know Before You Crop.) For the version shown, I cropped to a 2:3 aspect ratio (4x6) but also did another version with a widescreen (1:2.35) aspect ratio.

Now you need to decide which portion of which picture to use as part of the final composition. Use guides to divide your composition into equal slices (or not, if you prefer). Then, click to select the top-most layer. Go to Layer -> Layer Mask -> Reveal All. This will add an all-white layer mask next to this layer. Now, use the select tool to select the sections of this image that you do not want to show.

The selected portion of the image will have a black layer mask added to hide it from view.

Click to select the layer mask, and then use the paint bucket tool to paint the selection black. This will hide that portion of the image from view. Repeat this process of adding a layer mask and selecting only the desired section of each of the images. Then you will have your final image - a collage across the day including a slice for each photograph!

Final composition showing Layers Palette with black and white layer masks.

There you have it!  What will you photograph and create?  Share a link in the comments below!

Want more great ideas? Follow Boost Your Photography on Pinterest: Boost Your Photography

Monday, April 14, 2014

Eclipse Tonight! and A Year Ago on Boost Your Photography

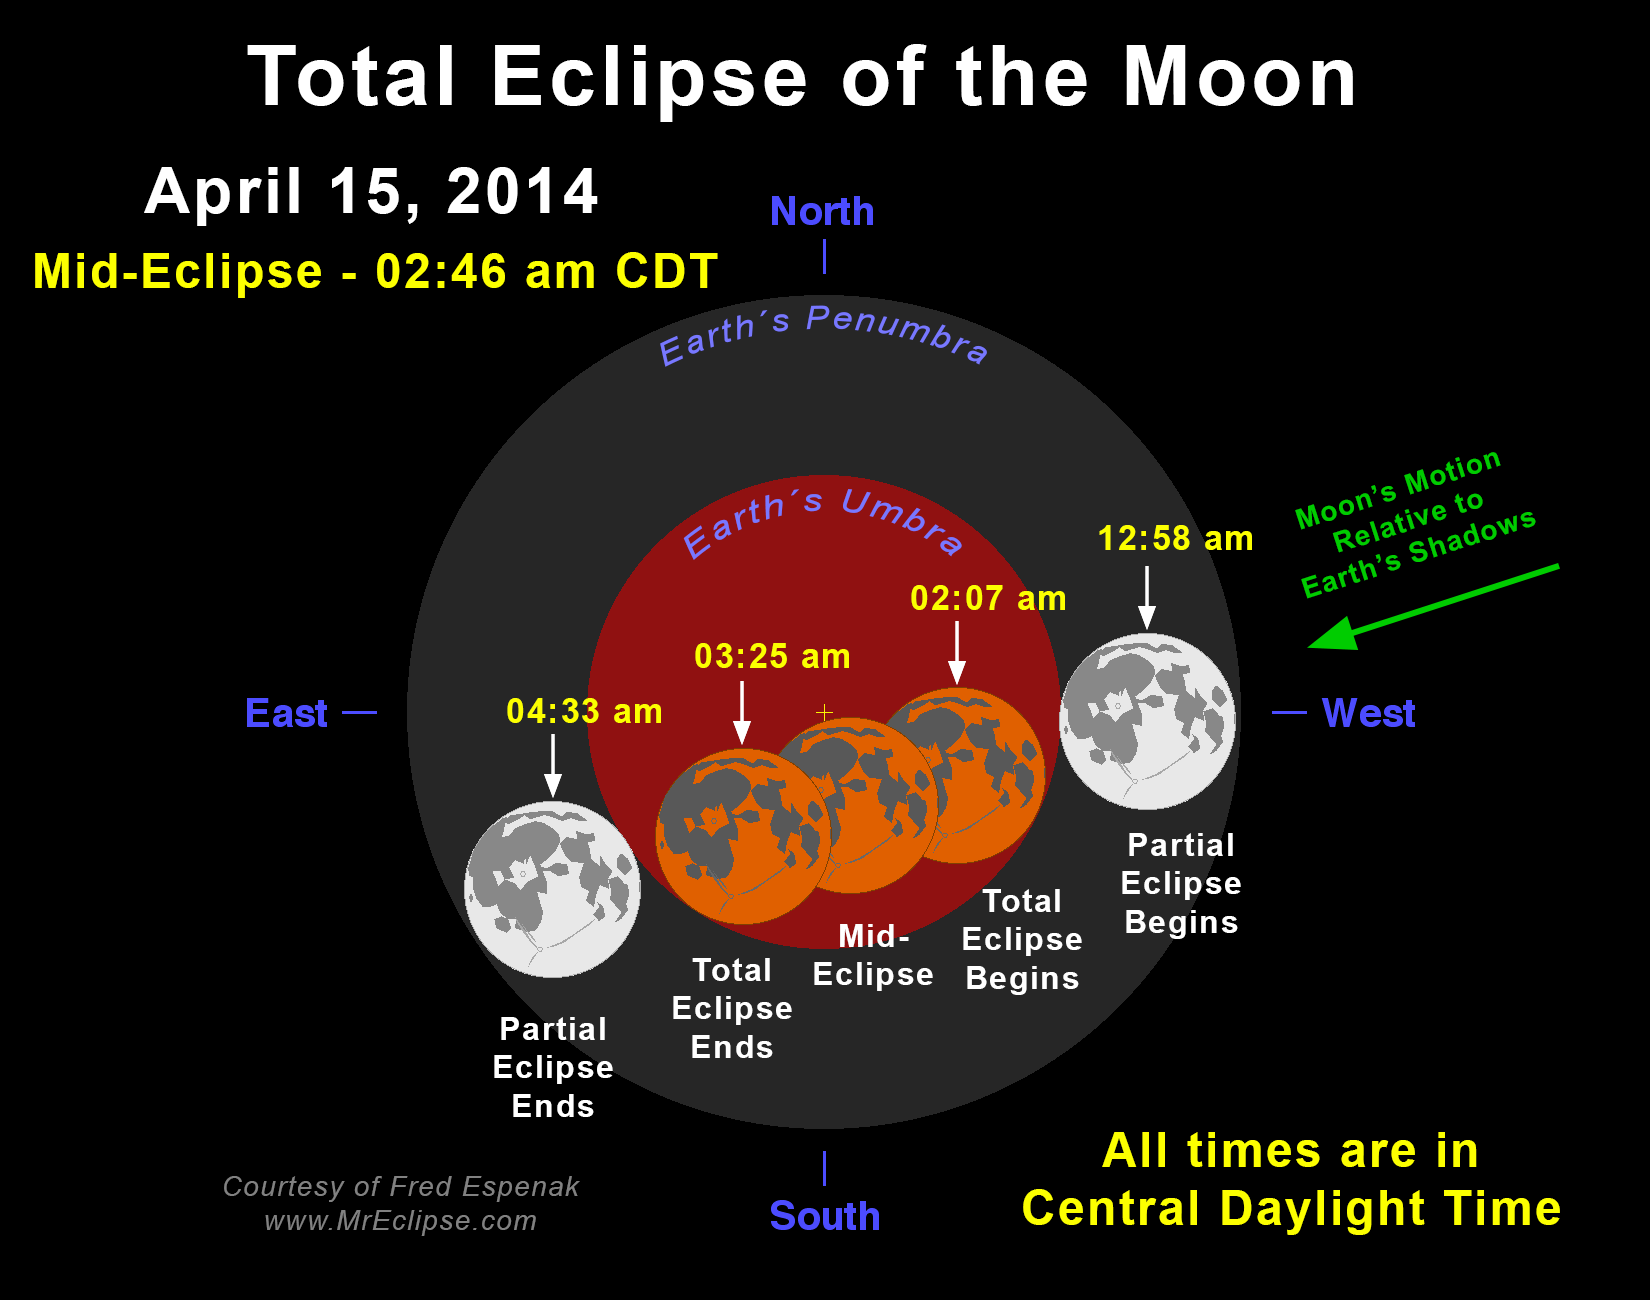
You may have heard that tonight (April 14th or the early morning of April 15th) is an opportunity to watch and photograph a full lunar eclipse! I have only been successful once in capturing an eclipse and am hoping the weather cooperates tonight (ha!) for another.

Please click on the image above for more details and versions of the figure in different time zones.
Photo reused via Creative Commons license from http://www.mreclipse.com/

If you are interested, here are a few more useful links to get you prepared:
  • Tips for Photographing the Lunar Eclipse - this article and video will answer all your questions about the specifics of tonight's particular eclipse as well as provide some useful shooting advice and settings suggestions
  • How to Photograph a Lunar Eclipse - straight-forward and detailed, this article provides suggestions for the exact settings to try for successful eclipse photographs
Also, if you missed it, I had another guest post this week on Digital Photography School:

And now back to our regularly scheduled "A Year Ago on Boost Your Photography..."

2013:


  • Capture the Seasons: Rephotography. With Spring finally arriving, now is a great time to think about starting a seasonal series. This post offers useful suggestions for choosing an ideal location and making the commitment to return during the course of the year.


  • Macro and Close-Up Photography: Tips and Tricks. This is the fourth and final article in my guest post series on Photokonnexion. It includes an overview of suggestions for depth of field, shooting macro with and without a tripod, and how to combine various methods to achieve super close-in photographic results.

Don't Miss a Single Post from Boost Your Photography

Follow along on Facebook

Follow along on Google+

Follow along on Twitter

Follow along on Pinterest

Follow along on Bloglovin'

Or, receive updates daily or weekly via email. Use the subscription box in the right-hand column.

Saturday, April 12, 2014

Teaching Kids Photography: Shooting Modes, Focus, and Exposure

Photography is a great hobby to share with kids, and the ever-increasing accessibility of point-and-shoot cameras and camera phones makes this even easier. This is the first article in an occasional series about Teaching Kids Photography. Part 2 focuses on Composition and Design. (You might even learn something new yourself!)

Teaching Photography: where to start?

Last semester, I ran a monthly Photography Club for upper elementary and middle school students. Many of the students had never really been given an opportunity to use a digital camera and were excited to learn. The biggest question in my mind, of course, was where to start?

I knew that one of my goals was to help teach them how to control their cameras and to get the kind of shots they envisioned. So, I decided to start with a brief overview of the commonly available shooting modes, so that they could immediately move beyond Auto and exert some measure of control over their camera.

Common Shooting Modes

Students either brought in a phone or camera from home or shared some of the few point-and-shoot cameras provided by myself and the school, so everyone had different menus and options to choose from. With that in mind, I only introduced some of the more common shooting modes that are widely available on digital cameras.
Photographing started right from the start. Here, a student captured me in motion, discussion shooting modes.

Below is an easier-to-read version of the slide that I was showing, detailing some of the most common shooting modes available on point-and-shoot and DSLR cameras.

Examples of Shooting Modes in Photography | Boost Your Photography

Macro and portrait modes were by-far the most popular. Later on, some kids chose to explore some of the more unusual shooting modes and effects, like taking pictures in 'toy camera' mode to make everything look small and dollhouse-like or fisheye-type effects. By understanding what mode to choose for a given photography situation, the kids were better-able to capture the kinds of shots they wanted.

Toy Camera Effect on the nearby construction site

Focus and Exposure

My other main lesson for our first meeting was the link between focus and exposure with point-and-shoot cameras. With a point-and-shoot camera, when you press the shutter down halfway, the camera locks focus. Pressing the shutter the rest of the way takes the picture. But what I wanted the kids to understand was that pushing the shutter down halfway also locks the exposure or how light or dark the final photograph appears. (For more technical details about exposure, especially with DSLR cameras, read All about Exposure and Troubleshooting Your Exposure.)

For our first experiment, I asked everyone to turn around and point their cameras at the window. Then, holding down the shutter halfway, I asked them to look at how the camera interpreted the scene. The second step was to change the composition slightly so that it included a good section of the wall next to the window and to repeat holding down the shutter. They were amazed at the dramatic differences in light and darks between the two views.

Focus and exposure locked at the center of the image.
Focus and exposure also locked at the center of the image.

This led to a quick discussion of the strategy of "Focus and Recompose." The idea here is that you first decide on the composition you want (say, a view out the window). Then, you hold the shutter halfway down and see if the version in the viewfinder matches how you wanted the scene to look. If not, change the composition slightly, depress the shutter halfway, and then move the camera back to the original composition. Even without knowing anything else about exposure or camera settings, the kids were easily able to control and manipulate the desired lightness and darkness in their photographs.

Photography Exploration

The most important part of any photography lesson, however, is the application. After the initial lesson and discussion described above, we took a forty-five minute slow-moving walking tour outside on the playground and nature trail. I hung back to answer questions, and the kids were free to explore and photograph whatever inspired them. The following are just a few small samples of their creativity during our first meeting. (I have deliberately left out identifiable photographs of the students themselves, so just imagine an additional quantity of portrait-style and "I'm taking a photo of you taking a photo of me!"-style shots here too.)

Close-up photograph of a milkweed pod
Exploring patterns from beneath the play equipment
An effort to capture the motion of jumping
Blur from intentional camera movement using a slower shutter speed
Shooting shadows with attitude

Conclusion: Teaching Kids Photography

There are endless different ways to teach children photography and to nurture a love of photographing and exploring the world around them. Since I was working with older kids (10-14 year olds), it made sense to start with some of the technical controls before letting them loose to explore. With younger children, you might want to focus more on just the idea of focus or on holding the camera still when shooting. Part 2 in this series focuses on teaching about composition and design.

Where did you start with teaching children about photography? Share a tip or advice in the comments below!


Boost Your Photography: Learn Your DSLR is now available from Amazon. Get the most out of your camera with practical advice about the technical and creative aspects of DSLR photography that will have you taking beautiful pictures right away.